
- Mazes For Programmers part 1, introduction
- Mazes For Programmers part 2, some basics
- Mazes For Programmers part 3, graphical UI
- Mazes For Programmers part 4, implementing the first two algorithms
- Mazes For Programmers part 5, Dijkstra’s algorithm
- Mazes For Programmers part 6, paths through the mazes
- Mazes For Programmers part 7, the Aldous-Broder algorithm, and when random is not very random
- Mazes For Programmers part 8, a random walk with Wilson’s algorithm
- Mazes For Programmers part 9, some statistics, and combining the Aldous-Broder and Wilson’s algorithms
- Mazes For Programmers part 10, improving the Aldous-Broder algorithm to remove short dead-ends
- Mazes For Programmers part 11, Ruby vs C# speed tests
- Source code on GitHub
The main part of Dijkstra’s algorithm is implemented in the Distances class. For the most part, my code didn’t look that much different from his. The main change was that I was able to use Linq to remove an if when traversing the frontier…
    public Distances Distances() {
      Distances distances = new Distances(this);
      List<Cell> frontier = new List<Cell> { this };
      while (frontier.Any()) {
        List<Cell> newFrontier = new List<Cell>();
        frontier.ForEach(c => c.Links
                               .Where(cl => !distances.Cells.Select(dc => dc.Cell).Contains(cl))
                               .ForEach(link => {
          distances.Add(link, distances[c] + 1);
          newFrontier.Add(link);
        }));
        frontier = newFrontier;
      }
      return distances;
    }
I broke lines 6-8 into three to make it easier to read in this blog, but in the code, it’s just one line. Linq enabled me to avoid having to check if the next cell had already been linked.
Adding the numbers to the text output was very simple, as I already added the facility to display cell contents (see part 2 of this series). The challenge was putting these numbers on the UI.
This turned out to be much easier than I expected, and even worked first time, which surprised me! I added a method to the window’s code behind, passing in the distances collection and the two cell sizes (calculated earlier, see part 3 of this series)…
    private void DrawDistances(Distances d, double hCellSize, double vCellSize) =>
      d.Cells.ForEach(cellDistance => {
        TextBlock tb = new TextBlock {
          Text = cellDistance.Distance.ToString(),
          Margin = new Thickness(cellDistance.Cell.Col * hCellSize + 10,
                                 cellDistance.Cell.Row * vCellSize + 10, 0, 0)
        };
        MazeCanvas.Children.Add(tb);
      });
This looked fine…
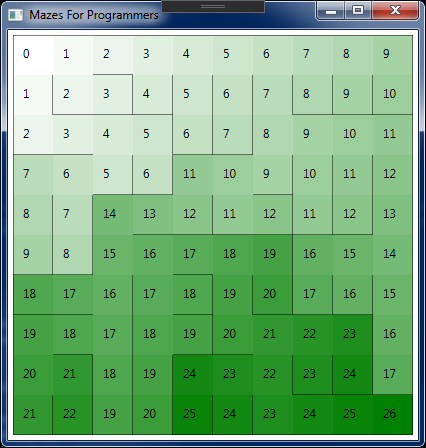
OK, so I’m getting ahead of myself, as this shows the maze after I added code to colour the cells, based on their distance from the north-west corner (see below), but it shows the numbering nicely.
Colouring the maze
For some reason, the author added an outer loop to do the colouring. First time through he coloured the cells, then looped again to draw the walls. This added an extra loop and an extra if to the code. Being the simple sort, I decided to keep the one loop, and just colour the cell immediately before drawing the walls. I’m not sure if there would be any noticeable difference in speed (highly doubtful), but I think my code was much clearer.
Inside the loop that draw the walls (see part 2 of this series for details) I added a call to a method to draw the background…
  Cell thisCell = maze[row, col];
  ColourCell(d.Max.Distance, d, thisCell, hCellSize, vCellSize);
  if (!thisCell.Linked(thisCell.South)) {
    DrawLine(hOffset, vOffset + vCellSize, hOffset + hCellSize, vOffset + vCellSize);
  }
  if (!thisCell.Linked(thisCell.East)) {
    DrawLine(hOffset + hCellSize, vOffset, hOffset + hCellSize, vOffset + vCellSize);
  }
The ColorCell method used his algorithm for picking a colour (as my knowledge of colouring is sketchy at best, and his seemed to work well)…
  private void ColourCell(int maxDist, Distances d, Cell thisCell, double hCellSize, double vCellSize) {
    float intensity = (float)(maxDist - d[thisCell]) / maxDist;
    byte dark = (byte)(255 * intensity);
    byte bright = (byte)(127 * intensity + 128);
    Rectangle rect = new Rectangle {
      Fill = new SolidColorBrush(Color.FromRgb(dark, bright, dark)),
      Width = hCellSize,
      Height = vCellSize,
      Margin = new Thickness(thisCell.Col * hCellSize, thisCell.Row * vCellSize, hCellSize, vCellSize)
    };
    MazeCanvas.Children.Add(rect);
  }
The only difference is that as I’m using WPF, I added a Rect object to the canvas.
Subclassing the grid
The final change I made from his code was that I didn’t create a Distancegrid class (which would have been called DistanceMaze in my code), as I didn’t see the point. All his subclass did was to override the way he displayed the contents of a cell, but as I already had code in the basic grid to handle that, I could use that and pass in the string format I wanted.
Actually, there was one small change I made, and that was to take advantage of the fact that the text display allowed three characters for the cell. He only displayed the distance number as a single character, which even using the base 36 format he chose only allowed for small grids to be displayed. By utilising all three characters, I could display distance numbers up to 999, allowing for much larger mazes to be displayed without breaking the format…
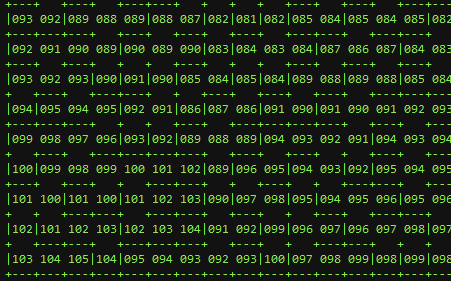
This shows the bottom-left corner of a maze with 1500 rows, where you can see that the distances grew to need three digits.
As it happens, I found it quite difficult to generate a maze big enough to need three digits and still have any chance of seeing it on a screen, but even two digits allowed a much wider variety of mazes to be displayed this way.
Be First to Comment