As I have mentioned a couple of times, I’ve been creating some reusable Blazor components, to save time on future development. I had vaguely looked at trying to create a Nuget package for these, but never got around to it. Well, I finally did, and although it was a bit of a rough ride, it all seems to be working smoothly now.
I ended up three Blazor packages and one C# one. Along with a sample Blazor web site to demonstrate the components, and a test project for the C# class library, this gave me a project structure like this (not in alphabetical order for clarity)…
Pixata.Utilities
  * Pixata.Blazor - A Blazor class library for the Blazor components
  * Pixata.Blazor.Sample - A Blazor web site to demonstrate the components
  * Pixata.Blazor.LanguageExtComponents - Some components designed for working with the LanguageExt Nuget package
  * Pixata.Extensions - A C# class library containing some extension methods I have found useful over the years
  * Pixata.Extensions.Tests - A set of unit tests for the methods in the previous project
All of these can be found in the GitHub repository.
The Pixata.Blazor library currently contains a dependency on the Telerik components for Blazor. I intend to split off the components that depend on this package into a new project, so the main Pixata.Blazor one can be used by people without a Telerik licence.
There were a few things I needed to learn to get this working…
- How to set up the project in Visual Studio for publishing
- How to create GitHub actions to build the projects
- How to create GitHub actions to deploy them as Nuget packages
- How to deploy a web site to IIS via FTP
Each of these was a bit of a battle, and I’m going to document it here in case it’s of use to anyone (including me next time I want to do it and can’t remember what I did!).
How to set up the project in Visual Studio for publishing
This was fairly simple. I didn’t really do much more than set the project properties for the ones that were going to end up as Nuget packages…
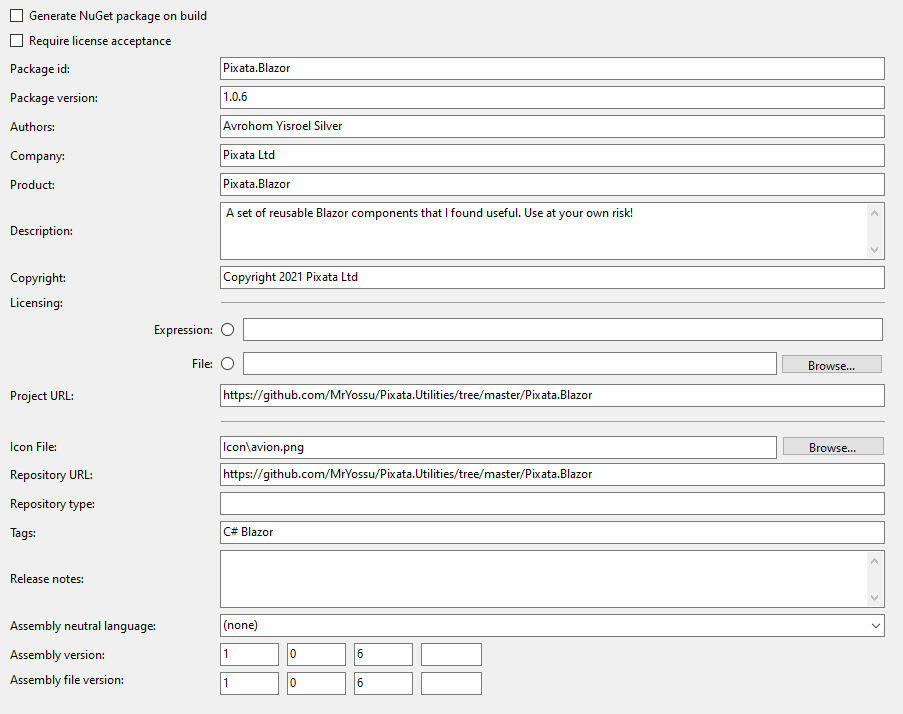
I set the same version in the “Package version” and the two assembly versions. The rest is all self-explanatory.
While researching creating Nuget packages, I saw quite a few places mention that you needed a .nuspec file. I wasted quite a bit of time with these, until I found out you don’t need them at all.
How to create GitHub actions to build the projects
Here was the main challenge. GitHub actions are an extremely powerful tool, but like all such tools, they can be quite daunting at first. It took me quite some time, and quite a lot of searching around to work out how to get this working. From the Actions link at the top of the GitHub repository page, you click the link to set up a workflow yourself. It is possible that one of the pre-defined ones might have worked, but I didn’t use them.
One thing that is good about actions is that people have created reusable actions, which you can call from your own actions, saving you form having to reinvent the wheel or copy and paste large chunks of code. I used a couple of these below.
This creates a .yml file (previously known as yaml for Yet Another Markup Language), which sets out what the action should do. If you look at my working master branch workflow, you can see the instructions that are carried out every time I commit to the master branch. The very top of the file defines the name for the workflow, and the next section specifies when it will be run, ie whenever I push to the master branch…
on:
  push:
    branches: [ master ]
After that, you can specify any number of jobs, each of which has steps. I only used the one job. I’m not sure why you might want to use more than one. The first thing I did in the job was to specify the VM that will be used for the action (Windows in my case), and then checking out the source code and setting up .NET…
jobs:
  build_pixata:
    runs-on: windows-latest
    steps:
    - name: Checkout
      uses: actions/checkout@v2
      with:
        fetch-depth: 0

    - name: Setup .NET Core
      uses: actions/[email protected]
      with:
        dotnet-version: '5.0'
As you can see, I’m using a GitHub reusable action named checkout to check the code out, and another setup-dotnet to set up .NET/ These two are provided by GitHub, but there are plenty provided by other people, as we’ll see below.
After that, it was a matter of building each project. As mentioned above, the Pixata.Blazor project (and all projects that depend on it) depend on the Telerik package, so I needed to restore the Nuget package form their private Nuget feed. This caused some headaches, but I had some great help from Lance McCarthy, who is a Telerik employee and very helpful (thanks again Lance!).
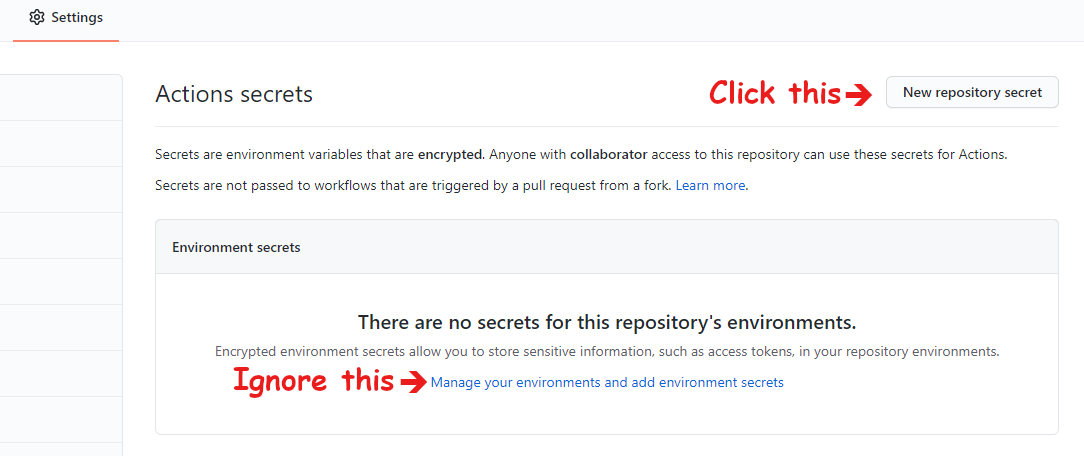
In order to allow the job to log in to the Telerik feed, I had to add secrets to my repository. These allow you to store sensitive information, such as user names and passwords, in a way that they cannot be seen by anyone (even me, I can only overwrite the value, I can’t see what they are), but can be used in actions.
Secrets can be set by clicking the Settings link at the top of the GitHub window, then clicking the Secrets link near the bottom of the nav bar down the left side of the page. I got this wrong at first, as I added codespace secrets, not action secrets. This was partly because the message that greets you when you first go to this page is confusing (in my opinion), and encourages you to add environment secrets. You have to notice the innocuous “New repository secret” button at the top right of this page…
Once you have your secrets added, you can use them in your action. Here are two steps for the Pixata.Blazor project, one to restore the Nuget packages, and one to build the project. I’m not actually sure I needed to include the secrets in the build step, but I left them in anyway…
    - name: Restore - Pixata.Blazor Dependencies
      run: dotnet restore Pixata.Blazor/Pixata.Blazor.csproj  --configfile ./nuget.config
      env:
        TELERIK_USERNAME: ${{secrets.MYTELERIKACCOUNTUSERNAME}}
        TELERIK_PASSWORD: ${{secrets.MYTELERIKACCOUNTPASSWORD}}

    - name: Build - Pixata.Blazor.csproj
      run: dotnet build Pixata.Blazor/Pixata.Blazor.csproj  --configuration Release --configfile ./nuget.config
      env:
        TELERIK_USERNAME: ${{secrets.MYTELERIKACCOUNTUSERNAME}}
        TELERIK_PASSWORD: ${{secrets.MYTELERIKACCOUNTPASSWORD}}
The Nuget.config file lives at the solution root, next to the .sln file, and in my case looks like this…
<?xml version="1.0" encoding="utf-8"?>
<configuration>
  <packageRestore>
    <add key="enabled" value="True" />
    <add key="automatic" value="True" />
  </packageRestore>
  <packageSources>
    <clear />
    <add key="NuGet" value="https://api.nuget.org/v3/index.json" />
    <add key="TelerikFeed" value="https://nuget.telerik.com/nuget" />
  </packageSources>
  <packageSourceCredentials>
    <TelerikFeed>
      <add key="Username" value="%TELERIK_USERNAME%" />
      <add key="ClearTextPassword" value="%TELERIK_PASSWORD%" />
    </TelerikFeed>
  </packageSourceCredentials>
</configuration>
I don’t know if you need one of these if you are only using packages on the public Nuget feed.
The last thing in the master action was to run the unit tests. You must make sure to restore and build all projects before doing this…
    - name: Run Tests
      run: dotnet test --verbosity normal
That’s it for the master action. Every time I push to the master branch, the action is run, and the projects are built.
Publishing the Nuget packages from the release branch
OK, so far so good, but we still can’t use this code yet. We now need a release.yml action that will publish the Nuget packages. This is mostly a copy from the previous action, except that this is only run when code is pushed to the release branch…
on:
  push:
    branches: [ release ]
After that, it’s all the same until we’ve run the unit tests. In order to publish to Nuget, we need a Nuget API key. You need to log in to the Nuget site, which you can do with your Microsoft account, then click your user name (top right of the page) and choose “API Keys”…

Yes, that really is me, although a long time ago. I was quite cute really!
You can create an API key from here, and store it as a secret in your GitHub repository. mae sure to keep a note of the API key, and you can’t get it again, you have to regenerate it if you lose it.
Once you have the key saved as a secret, publishing the Nuget package is embarrassingly easy…
    - name: Publish Pixata.Blazor
      uses: brandedoutcast/[email protected]
      with:
       PROJECT_FILE_PATH: Pixata.Blazor/Pixata.Blazor.csproj
       NUGET_KEY: ${{secrets.NUGET_API_KEY}}
This uses an action created by GitHub user brandedoutcast. This action seems to be very widely used, and worked very well.
I’ve spared you the serious amount of pulling of hair and gnashing of teeth that it took to get to this point, but with great excitement, I saw my packages appear on Nuget…
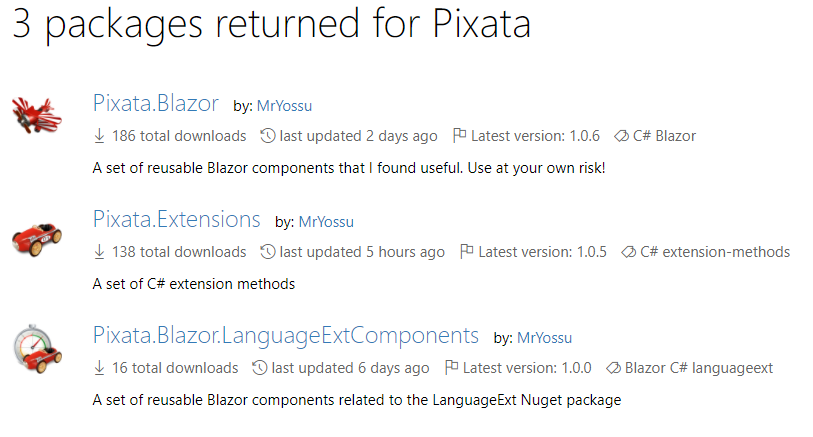
At the time, these all showed version 1.0.0 and no downloads, but the idea is the same. I’m actually quite interested as to who downloaded them, as I haven’t told anyone except my son (who has looked at, but not yet tried them).
Deploying a web site to IIS via FTP
I was left with one more challenge. As I mentioned earlier, I had added a sample Blazor web project to the solution, to demonstrate the components. I though tit would be nice if I could have this published by the action as well. My web sites are hosted on a third-party server, and I only have control panel and FTP access, so would have to deploy by FTP.
Flushed with my successes with the Nuget packages, I did a quick search, and found a GitHub action for uploading files by FTP. My first attempt at this was a dismal failure, until it dawned on me that I hadn’t published the web site, so was uploading the contents of the bin folder, duh!
Again, to save you the pain of what failed, the end result was pretty simple…
    - name: Publish Pixata.Blazor.Sample
      run: dotnet publish Pixata.Blazor.Sample\Pixata.Blazor.Sample.csproj --framework net5.0 --output Pixata.Blazor.Sample.Publish

    - name: Deploy Pixata.Blazor.Sample
      uses: SamKirkland/[email protected]
      with:
        server: ${{ secrets.PIXATATESTFTPSERVER }}
        username: ${{ secrets.PIXATATESTFTPUSER }}
        password: ${{ secrets.PIXATATESTFTPPASSWORD }}
        local-dir: ./Pixata.Blazor.Sample.Publish/
Amazingly enough, this worked first time. Sadly, it failed second time!
As anyone who has deployed an ASP.NET web site manually will probably know, IIS locks some of the files, preventing you from overwriting them. The second time I tried to deploy the site, it failed for this reason.
This is where the most frustrating part of this whole story began. Apparently, I am the first person in the entire world who has ever wanted to deploy a site to IIS from GitHub using FTP. I know, you don’t believe me, but I must be, as I couldn’t find anyone who had documented what you need to do to get it working.
One thing I did discover is that if you upload a file named app_offline.htm to the site, then IIS will stop the site, and will unlock the DLLs, allowing you to deploy your site. Ha, easy peasy eh? No, not at all. I managed to upload my app_offline.htm by creating a temporary folder, the creating a app_offline.htm inside that, and then uploading the whole folder to the root of the web site. That was all necessary, as the FTP action I was using only allowed you to upload a whole folder, not a single file.
That all worked, but then I couldn’t find a way to delete the file, so that IIS would start the site again. Eventually, someone suggested to me that I use Python, as that has FTP built in. Moreover, the VM that GitHub spins up includes Python, yippee!
It took me a bit of fiddling to work out how to do it, but in the end, I manually uploaded a file named _app_offline.htm (note the leading underscore which makes IIS ignore it), and the before deploying my site, I used Python to rename it to app_offline.htm. After deploying, I renamed it back to _app_offline.htm ready for next time. This worked a charm, the sample Blazor site was live.
Here are the relevant bit of the action…
    - name: Publish Pixata.Blazor.Sample
      run: dotnet publish Pixata.Blazor.Sample\Pixata.Blazor.Sample.csproj --framework net5.0 --output Pixata.Blazor.Sample.Publish

    - name: Deploy Pixata.Blazor.Sample
      uses: SamKirkland/[email protected]
      with:
        server: ${{ secrets.PIXATATESTFTPSERVER }}
        username: ${{ secrets.PIXATATESTFTPUSER }}
        password: ${{ secrets.PIXATATESTFTPPASSWORD }}
        local-dir: ./Pixata.Blazor.Sample.Publish/
Phew, what a long and painful journey that was. However, I think I understand it all now. Ha, until next time I try it of course!
If you are interested, you can see the full .yml file here.
Be First to Comment